Assessment &
Analysis
- Identify the problem
- Determine the suitability of orthotic
intervention to address the problem
- Define the objectives of orthotic
intervention
- Determine the orthotic design and
suitable orthotic materials
Points to consider:
- Condition of the skin with attention
to: fragile skin, circulation, wounds,
etc.
- Sensation
- Bony prominences
- Pain
Choosing correct
thermoplastic
Points to consider:
- Localization
- Age of the patient
- Constitutional type
- Pathology
| |
Kids |
Teens |
Adults |
| Body
part |
|
|
|
| Finger |
Multicast Standard
0.8mm Micro |
Multicast Standard
0.8mm Micro |
Multicast Standard
1.6mm Micro |
| Wrist |
Multicast Standard
1.6 – 2mm Micro |
Multicast Standard
2 – 2.5mm Micro/Mini |
Multicast Standard
2.5 – 3.2mm Mini |
| Elbow |
Multicast Rigid
2mm Micro |
Multicast Rigid
3mm Mini
|
Multicast Rigid
3.2mm Non/Mini |
| Shoulder |
Multicast Standard
2mm Micro |
Multicast Standard
2.5mm Mini/Multi |
Multicast Standard
3mm Non/Mini |
| Body |
Multicast Rigid
3mm Multi |
Multicast Rigid
3mm Multi |
Multicast Rigid
4mm Mini |
| Lower
leg |
Multicast Standard
2mm Micro |
Multicast Rigid
3.2mm Mini/Non |
Multicast Rigid
3.2mm Mini/Non |
Multicast
Standard can be substituted
by Multicast
Ortho depending on processing
and splint preference, e.g. Multicast
Ortho is transparent when heated
Material selection
- Points to consider:
- Multicast Standard is preferable for the orthosis with
the small surface.
- Multicast Standard is preferable for children.
- Multicast Standard is preferable when applied over a bandage.
Material does not stick to bandage.
Highly recommended for post-operative
splinting and burn injuries.
- Multicast Rigid is
preferable for orthosis with large surface.
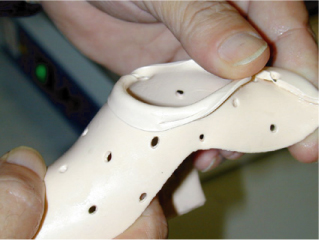
- Choose a thermoplastic with large
ventilation holes, such as Micro and
Multi to prevent skin maceration.
- If have limited experience with splinting
techniques choose Mini perforated plates
instead of Multi.
- Non-perforated plates are only used
for non-circular orthosis that cover
less then half of the body surface.
Absence of ventilation holes will lead
to skin maceration.
- Choose Multicast Standard or Multicast Ortho when using Gravity-Assisted Moulding
techniques.
- For vertical moulding choose thermoplastics
with good adhering surface, such as Multicast Ortho or Multicast Rigid.
Producing
the custom pattern
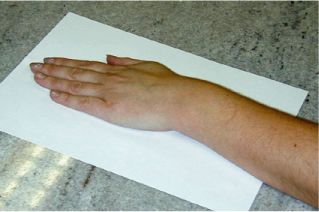
1. Position the client’s hand and forearm
in pronation on the paper towel.
2. Trace around client’s
hand and forearm and note landmarks.
3. Add guide marks to the
pattern.
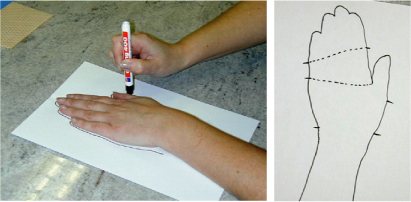
4. Connect the guide marks
to create the custom pattern outline.
5. Cut out the paper pattern.
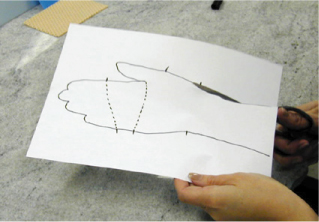
6. To check the fit, apply
pattern to the client’s limb and position
the joints as they will be when orthosis
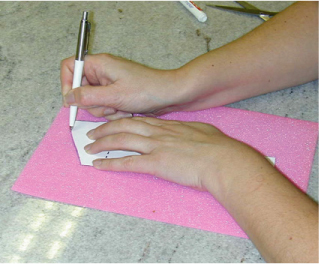
is moulded. Transfer the pattern on the
thermoplastic. Size and cut.
Protecting bony
prominences
- Flare or dome material away from the
bony prominence during the moulding
process.
- Pad the bony prominence(s) before
molding thermoplastic. Don't add padding
after moulding because it will compress
the tissue over the bony prominence.
Skin problems?
Any kind of thermoplastic material worn
permanently by the patient over a long
period will suffocate the skin. The material
does not breathe and as such does not
drain away transpiration and exudation.
After some time, epidermis will result.
To prevent skin problems:
- Use Micro or Multi perforated sheets.
Mini perforated sheets do not improve
ventilation: the perforation will only
result in local ventilation, near the
holes.
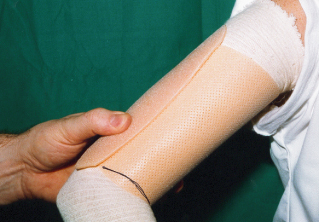
- Apply stockinet under the thermoplastic
(e.g. braces of tibia, humorous, corsets).
- Line the splints with felt or self-adhesive
toweling cloth. This improves comfort
as far as softness and absorption of
transpiration are concerned. Before
lining a splint with felt, the space
occupied by the felt should be taken
into account. This can be avoided by
attaching felt to the limb or by using
a thick stockinet.
- Provide a splint with the larger ventilation
holes.
- Remove the splint or brace for some
time every day (if possible).
Processing Methods
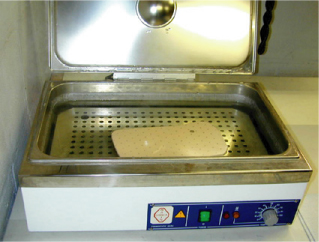
Water Bath - also available from Algeos
The material may be heated in the following
ways:
- Water (from 60 - 75°C)
- Steam (from 90°C)
- Dry heat (max 150°C)
- Heat gun
- Heating plate
Multicast Standard Processing:
The material can be processed after 2
minutes of heating at 75°C (167°F)
or 1 minute of heating at 80°C or
until a dark “glazy” discoloration has
appeared.
After heating in water at 75°C (167°F)
lift the material out and place it immediately
on a dry towel. Fold half of the towel
over the whole plate to dab excess moisture.

Material can be now placed
directly on the bare skin. In the meantime,
the temperature has fallen to about 40°C/105°F,
which is experienced as agreeable. If
working at a higher temperature is required
in order to get more modeling time it
is advisable to protect the skin with
stockinet or another kind of tubular bandage.
Multicast Ortho
& Multicast Rigid Processing:
Using a water bath processing
temperature is between 60°C-65°C.
With an oven: 100°C.
To soften Multicast Ortho
or Rigid, place the material into a water
bath at temperature 60°C - 65°C
(140°F - 159°F) for 60-90 seconds
or until sufficiently soft.
When ready, take the
material out of the water and place on
a flat surface (preferably a wooden board)
for 10 seconds. Temperature will immediately
drop to 35°C (95°F).
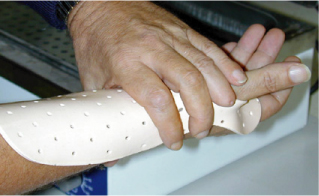
Take the splint with wet hands and position
it onto the patient. Immediately afterwards
wet your hands with cold water. This will
speed surface hardening and help prevent
imprints
Adjustment &
Trimming
While material is still somewhat warm,
use 3-point pressure to flare away from
the bony prominences. Correct the gaping
trough by squeezing in the sides of the
orthosis.
Mark the trip line (with
a fingernail or pen). Trim lines to ensure
freedom of the joints.
Spot heat the distal
edge by submersion in a hot water. Fold
the edges as necessary. Reheat and re-cut
the edge with long, smooth strokes to
remove irregularities.
Grind the edges (after cooling!)
and cover the edges if preferred.
When attaching straps, follow
these steps:
- Determine the optimum location and
width of the straps.
- Dry heat the adhesive backing of
the hook patch with a heat gun.
- Dry heat the attachment site on the
orthosis.
- Embed one edge of the patch into preheated
material.
- Remove the paper backing from the
hook and fold over one edge of the patch.
|